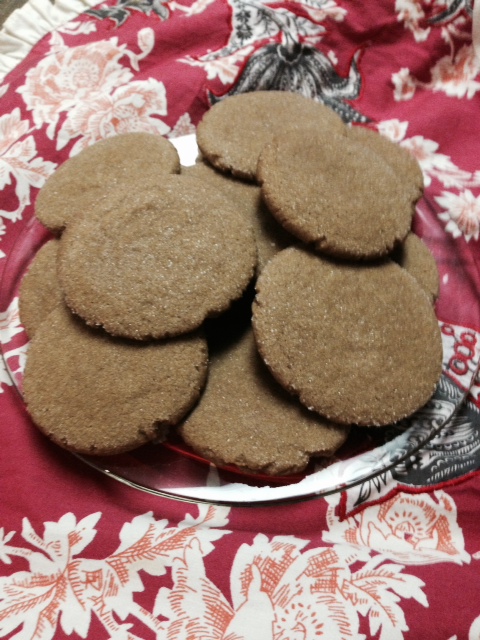
Gingerbread cookies and holidays are pretty synonymous. You can use this recipe to make gingerbread men but I prefer to “cheat” on this one. Making small 1 inch balls and flattening them with the bottom of a glass dipped in sugar is way easier, and the extra sugar on top gives a nice sweet layer! Just be prepared to want to dig into them right away- they smell amazing while they are cooking! In fact, I’m pretty sure that it is impossible not fall into the holiday spirit while these are baking! They are one of my favorite recipes to make and I’m not even a huge gingerbread fan! But they smell so good!
3 cups gluten free flour
1½ tsp baking powder
¾ tsp baking soda
¼ tsp salt
2 tsp ground ginger
2 tsp ground cinnamon
¼ tsp ground cloves
6 tbsp unsalted butter
¾ cup light brown sugar
1 large egg
½ cup molasses
2½ tsp vanilla
Preheat oven to 350 degreesIn a small bowl, combine flour, baking powder, baking soda, salt, ginger, cinnamon, and cloves until well blended
In a large bowl beat butter, brown sugar, and egg until well blended
Add molasses and vanilla and mix until well blended
Gradually stir in dry ingredients until blended and smooth. Dough will be pretty heavy and thick. Don’t worry! You did it right!
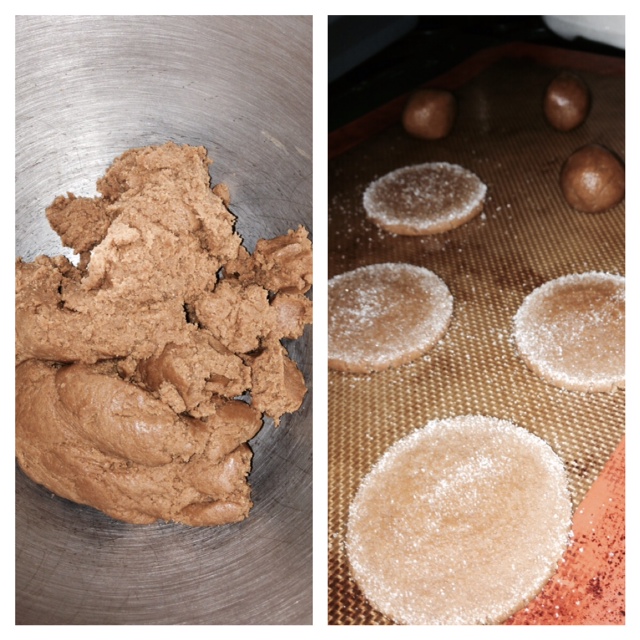
Divide dough in half and wrap each half in plastic and chill for about 1 hour. This allow the dough to harden slightly to allow you to roll the dough to be cut with your favorite cookie cutter
Roll dough into 1 inch balls and place on a cookie sheet lined with parchment paper
Add a small amount of sugar to a flat bottomed dish
Dampen the bottom of a glass and then dip in sugar before using glass to flatten cookies to ¼ inch thickness
Make sure cookies are spaced at least 2 inches apart to avoid touching when baking
Bake for 8-10 minutes or until the edges are golden
Allow cookies to cool slightly before removing from sheet and allow to completely cool on rack.
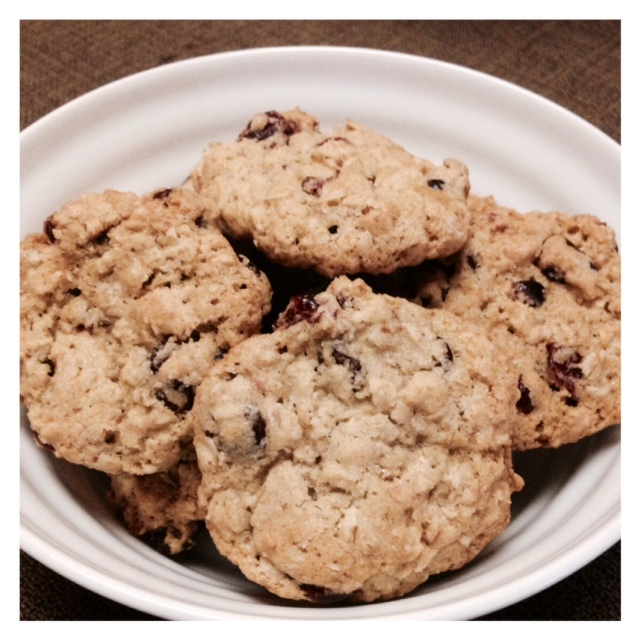
Thanksgiving is quickly approaching, though I’m not sure how it got here so soon this year! One of my mom’s favorite treats this time of year are my oatmeal cranberry cookies. I missed enjoying them when I first started living gluten free, but I managed to make a few changes to the recipe and found great oats to use and again, my favorite flour to use for holiday baking. Now, if you didn’t already realize that oats can be a problem on a gluten free diet then listen up. Generally speaking- oats are gluten free. The problem comes in their production at the factory- lots of cross contamination! In fact, a story in the Chicago SunTimes a few years ago showed that the gluten levels can be over 900ppm! Gluten free food is generally considered to be under 20ppm so thats pretty insane! There are a few gluten free options on there for oats so feel free to use other brands as well- but just make sure that they are not instant oats since those will not work well in this recipe and you will end up with a crunchy blob instead of a soft yummy oatmeal cookie!
1 ½ cups gluten free flour (Namaste perfect blend)
3 cups gluten free old fashioned rolled oats (my favorite gluten free brand is Bob’s Red Mill
1 tsp baking powder
1 tsp baking soda
1 cup unsalted butter, softened
1 cup sugar
1 cup packed light brown sugar
1 ½ tsp vanilla
2 large eggs
2 cups dried cranberries
Preheat oven to 350 degrees
In a large bowl, combine flour, oats, baking powder, and baking soda
In a separate large bowl, blend together butter and sugars until light and fluffy then beat in eggs and vanilla
Slowly add dry ingredients until well combined
Stir in cranberries
Drop dough in approximately 1 inch balls 4 inches apart on baking sheets. You can make it really easy by using a cookie dough scoop
Bake for 15 minutes or until golden
Allow cookies to cool slightly in order to set, then transfer to a wire rack to allow them to cool completely
Goodbye Halloween! Hello Thanksgiving! Time to make the transition to the next holiday! Now, I am definitely one of those people that absolutely loves this time of year. However, if I am to be perfectly honest, I may love it a little too much and struggled to NOT pull out the Christmas decorations while looking for my Thanksgiving centerpieces. I nearly justified putting up a Christmas tree as long as I didn’t put the ornaments on. Yeah. I’m one of those. You would think I was six instead of thirty-something! So this recipe is a perfect reflection of my holiday dilema! Christmas gingersnap cookies combined with yummy fall pumpkin? Ah-maze-ing!
½ cup of pumpkin puree
¼ cup of maple syrup
1 large egg
½ cup of butter, softened
1 cup sugar, plus more to roll your cookies in
1 ¼ teaspoon vanilla extract
2 ½ cups gluten free flour (again I used Namaste Perfect Blend)
2 teaspoons baking soda
2 teaspoons cinnamon
1 ½ teaspoons ground ginger
1 teaspoon ground cloves
½ teaspoon salt
In a medium bowl, whisk together flour, baking soda, spices, and salt.
In a large bowl, beat the butter and 1 cup sugar together until smooth.
Add the pumpkin, maple syrup, egg, and vanilla extract to the large bowl and mix until well combined.
Add dry ingredients to large bowl slowly and mix until combined.
Chill dough for 1 hour. If you skip this step your cookies may not be soft and fluffy!
Peheat oven to 350° F.
Place small amount of sugar in a small bowl.
Roll tablespoon-sized balls of dough in sugar until well coated and place on prepared baking sheet, about 2 inches apart.
Bake for 10–12 minutes, or until cookies look cracked and set at the edges.
Allow the cookies to cool for a 2-3 minutes after removing them from the oven, then transfer to a wire rack to cool completely. They will be soft when you remove them from the oven, but if you allow them to cool before transferring them to the wire rack will alow them to set and firm up just a bit!
When I was little, my mom and I would spend our weekends at our family house in Michigan. There was a store down the road the sold the BEST banana bread ever. Seriously- I’d eat the entire loaf by the end of the day. This is my favorite recipe for banana bread. The best part is, banana bread is meant to be heavy so gluten free baking is a little easier. I suggest using your favorite gluten free flour and for stuff like this my “go-to” choice is Namaste Foods Perfect Flour Blend. Xanthan gum is already included so it’s one less step to worry about!
2 cups gluten free flour blend
4 overripe bananas
1 ½ teaspoons baking soda
½ teaspoon salt
1 cup sugar
1 ½ sticks unsalted butter, melted
2 large eggs
2 tsp vanilla extract
½ cup chopped pecans
Preheat oven to 350 degrees F
Combine gluten free flour, baking soda, and salt. Mix well
In a separate bowl, whisk bananas and sugar until you make a banana cream
Add melted butter, eggs, and vanilla. Mix well
Slowly mix in dry ingredients
Gently fold in chopped pecans
Spray loaf pan with oil or prepare with grease (I prefer the spray to save on calories)
Bake for 90 minutes. When finished, the bread should be golden. Depending on your oven, you may need to rotate the loaf as well (I usually rotate it around 45 minutes)
Allow bread to cool for 5-10 minutes before removing from the pan. It should cool completely before slicing.
If you’re looking for an extra treat, you can sprinkle powdered sugar on slices as well!
Did you know that pumpkin seeds are incredibly healthy? They are terrific sources of heart healthy magnesium, zinc, which is not only great for your immune system but great for your skin, and fiber. I loved carving pumpkins as a kid (okay as an adult, too), but all too frequently we would toss the seeds into the garbage with the rest of the guts! I didn’t think that cleaning the seeds and roasting them would be worth all the effort when I could just go to the store and buy a bag. I was wrong. Yeah, they take a bit of work to clean and then time to roast but OMG. Delicious. They are now one of my favorite fall treats!
Clean the seeds of any pumpkin guts! No orange on these babies!
Boil for 10 minutes in salt water (1tsp salt). This extra step creates a crispy outer shell.
Drain & dry. I use a paper towel to pat the seeds. They stick to the towel, but you can pick them up with your fingers
Season ‘em. Spread seeds on baking sheet and drizzle with extra virgin olive oil. You can cheat here and use a spray as well. I think it gets the job done easier and you end up using less oil (unless you get trigger happy!). Sprinkle with sea salt .
Roast ‘em. Place baking sheet in the oven at 300F for 15 minutes, then remove and shake/toss seeds and continue roasting for 10-15 more minutes. Be careful not to burn the seeds! They are done when they have a nice golden color!
Now if you want to try other yummy spices, complete the first two steps (boil, drain & dry). THEN roast at 300 for 15 minutes to dry them. Toss seeds with olive oil, sea salt and spices, then return to oven and roast for 15-20 additional minutes until crispy/golden.
Fake: adj “having a false or misleading appearance”
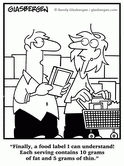
Come on everyone- we’ve all been there. At one time or another, all of us have wanted to be celiac free and not give as much thought to what we eat like we have been trained to do. We have all come to the point where we substitute our breads, pastas, cookies and pizzas with ease. We are all guilty of having that momentary excitement when we find one of our “old standbys” now have a gluten free version. I’ll admit it, I was pretty excited when I found that my local grocery store carried gluten free cupcakes on a regular basis- and they were tasty! When I was first diagnosed with celiac disease I was not underweight at all, in fact, when I went gluten free I managed to LOSE weight. Now as I learned to master the gluten free world the pounds starting to sneak back on- and on, and on.
I was a master of reading labels. I knew everything in my food to the point of obsession at times. However, while becoming the incredible gluten detecting machine I can be, I managed to overlook a vital part of food labels. Mainly calories, fat, and carbs- you know, the ones that fed my waistline to the point of being overweight. The scary part, though, is that this is pretty much the norm for most of the celiac community. Yikes! Time to get ourselves back in check!
First, I decided to start comparing gluten free versions to “real stuff.” Just a side note- when I approached a few gluten free friends, I was quickly shot down that GF versions are “real stuff” and I should get into the mind-frame of embracing my new GF world. Please disregard the politically incorrect label of GF foods here as fake and those containing gluten as real. I love my “fake food” which is what my family came to call my GF foods at home and I’ve learned to roll with the punches. I’m pretty proud that most of the time, they can’t find the “fake food” at the table. Also, let’s be honest, we can generally tell when things are GF- they tend to be a bit more heavy so those fluffy/airy treats were like are hard to come up with a GF version! My gluten free donut doesn’t compare to a Krispy Kreme. My gluten free pizza crust will never be the same as my favorite dive pizzeria. The important thing for for me though is that it’s okay. I still love my gluten free donuts and my gluten free pizzas. I’m all for substituting gluten free versions when possible. Everyone has their own preferences. For myself, I will substitute gluten free pasta any day. In my opinion, it’s mostly the sauce that makes the pasta yummy. I have a favorite GF bread as well, but I don’t like using it for sandwiches. I’ve now started to LOVE making lettuce wraps for lunch. And as I mentioned- those gluten free cupcakes from my local grocery store are delicious. Actually, my favorite cupcakery in the city is their supplier! Double yum! (if you’re in Chicago- its Swirlz. Seriously. To. Die. For.)
Second, I needed to learn to navigate those food labels again. I had become so intent of finding the gluten on the label that I developed tunnel vision! The other difference that we all have to watch out for in gluten free food is right there! Gluten free food usually requires “a little extra” added to them to make up for their glutenless existence. Sometimes it can be extra butter or sugar for texture and/or flavor. You know what that means, right? Extra calories and fat. In fact, it’s well known that gluten free foods tend to be higher in calories and fat than their gluten containing counterparts. So this adds to my dilemma- to fake it or not? My own opinion is that most of the time, faking it just isn’t worth it the majority of the time. I’m going to stick with my bunless burgers, my lettuce wrap sandwiches, and I’ll probably skip the cookies most of the time, too. For me, I’d rather save my calories for something else- like those cupcakes!
A few years ago I was introduced to essential oils by a friend of mine. Being a typical girl, I loved smelling the various fragrances and, as I’m sure most of you can relate, many of the scents triggered specific memories or feelings. Lavender has long been known to have a calming effect and is great for helping you relax. Citrus scents are great revitalizers- which is why it’s associated with summer scents/flavors! Eucalyptus (which is my absolute favorite) is great for that “clean feeling” and is often used to treat headaches, colds, and sinus congestion amongst other things. In homeopathic medicine as well as other non-western medical practices, aromatherapy is a well known and utilized tool. If you don’t believe me just think back to your childhood. If your mom was anything like mine, as soon as a cold started she would slather my chest with Vick’s Vapor Rub. What’s in that amazing little jar? Camphor, Eucalyptus oil, and menthol (amongst a few other things as well!).
One of my favorite things to do with my oils is to take a 4 oz spray bottle and fill it with water along with 25-30 drops of my favorite oil. Right now my spray bottle has lavender in it and I’ve sprayed it over the bed sheets/blankets for a calming feeling at night.
Another fun trick I have used is to take warm water with a few drops of oil and oak a few washcloths, ring them out, and put them in individual baggies. When I come home from the gym and need a quick pick me up, I can grab one from the refrigerator where I store them and hold it to my face for a few minutes and take some slow deep breaths. It works like a champ- between the cold and the aroma it’s heaven! (And in case you’re wondering- I use my orange citrus oil most of the time for the towels!)
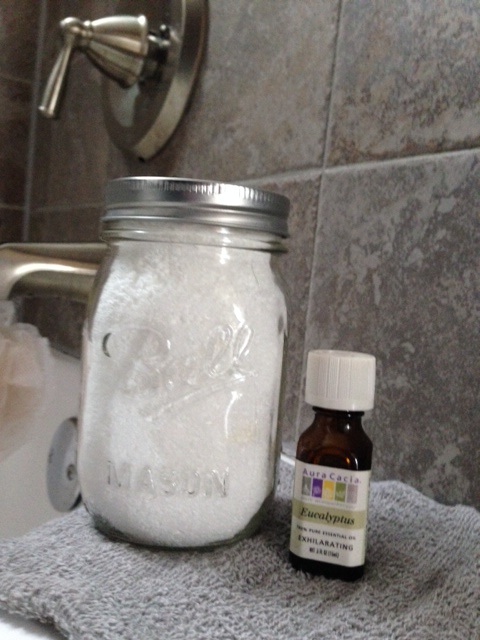
I know a lot of people like to add the oils to the bathtub, but I’ve never had much luck with simply putting drops in the water. Oil doesn’t dilute in the water. Umm it’s oil. My best solution is to take Epsom salt and add a few drops of my favorite essential oil (usually 1cup salt to 20-25 drops of oil). I’ve been known to make 2 cups at a time and then store them in an airtight container. Mason jars work great for this! Then add 1/2 cup to the water (or more if you’re so inclined) and enjoy a nice warm bath for 20 minutes! It’s a great way to end your day! You can use epsom salts, sea salts, etc, but remember the larger the salt is, the longer it takes to dissolve. Plus, you have to stand on them to get in the tub and then sit on them. Do you want to sit on pebbles during a bath?!?! I think not!
There are a ton of different websites to learn about the benefits of different oils. I tend to use Aura Cacia most often. Their website is great and there’s an app for your smartphone as well! They even have an essential oil directory to help you get started!
Pumpkin is full of vitamin A, vitamin C, and zinc. Together, these help create gorgeous skin! Since I seem to be on a pumpkin kick lately, here is an awesome scrub to use to try to avoid that winter skin slump!
Pumpkin Body Scrub (please note BODY, not FACIAL scrub)
Combine:
½ cup pumpkin puree
½ cup brown sugar
½ tsp cinnamon
While in the shower (and its best to let your skin soften a bit so I usually do it after I wash my hair), apply scrub in a circular motion from your feet up to your arms! Rinse and pat dry with a towel, apply your favorite lotion to help hydrate your skin even more.
Given that it is fall and pumpkins are super yummy, here is my favorite recipe for pumpkin cupcakes. Now I’m a huge fan of not reinventing the wheel. Betty Crocker makes a fabulous gluten free cake mix which I love to “fancy up” depending on the season! Why struggle with mixing different flours when you don’t have to!?!? Thanks Betty!
Pumpkin Spice Cake:
1 box yellow cake mix (gluten free of course!)
1 tbsp. pumpkin pie spice
1 ½ tsp. cinnamon
15 oz. pumpkin puree
3 eggs
½ cup vegetable oil
2 ½ tsp vanilla extract
If you don’t have pumpkin pie spice on hand you can mix up a batch of your own! This will make 7 tsp of pumpkin pie spice so you will have a bit left over to use later!
4 tsp ground cinnamon
1 tsp ground nutmeg
1 tsp ground allspice
2 tsp ground ginger
Preheat oven to 350 degrees
Line pans with your favorite cupcake liners
Mix together cake mix, pumpkin pie spice, and cinnamon and set aside
In a large bowl, mix pumpkin, eggs, oil and vanilla extract until smooth
Add cake mix/spice mixture slowly
Fill cupcake liners to ¾ full and bake for 18-20 minutes. Keep a close eye on them though after 15 minutes to make sure they don’t burn!
Allow cupcakes to cool completely before frosting!
Whipped Cream Cheese Frosting
8 oz cream cheese, softened (and no cheating with low fat versions here!)
1 cup powdered sugar
1½ teaspoon vanilla extract
16 oz heavy whipping cream
Beat cream cheese and powdered sugar until smooth
Slowly add vanilla and continue to beat mixture
Slowly add in heavy cream and continue to beat until stiff peaks begin to form
Growing up I was a tomboy. I loved baseball, lived for fishing with my dad, and loved being outdoors. My mom tried her hardest to introduce me to Barbie dolls and all things pink! Granted, I did have a strawberry shortcake bedspread on my canopy bed, but I loved my He-Man figures more than my My Little Pony. However, it wasn’t long before I found my girly side. Eventually I lived for our trips to the drugstore to get new nailpolish or a face mask- all by the ripe old age of 12. Wrinkles beware!
Through the eyes of my teenage self, looking good meant people liking me. I was convinced that the prettier and skinnier you were, the more likeable you were- more friends, more popularity, more happiness. I’d like to say that in my 20s I knew better. However, I think my 20’s were more of a learning experience in that regard. I learned how to appreciate my freckles. Actually, forget that. I LOVE my freckles. They are no longer the annoying polka dots on my body that my friends played connect the dots with in school. Instead, they represent so much fun that I had outdoors growing up. My grandfather once told me that I had freckles because God ran out of room in the sky for stars so He had to put them somewhere else. I also learned to appreciate my curves. Yup. I’m not stick thin. Never have been, never will be. What I once thought were “thunder thighs” were actually strong muscular legs from running and playing volleyball. My hourglass figure is what men actually find attractive (thank you Sofia Vergara, Christina Hendricks, and a multitude of other curvy ladies!).
Now you might be wondering why this post belongs on a gluten free blog. Well, if you picked up in my last blog or two, I managed to ingest a small amount of gluten. Daily. For about 8 weeks. Doh. One of the huge things I did notice was a change in my skin. It was dull, I was breaking out, my rashes started getting worse (eczema and psoriasis), and I was generally just well… exhausted. Of course gluten does not cause acne. It does not change your color of your skin, cause bags under your eyes, or cause you to look like you just rolled out of bed in the middle of the afternoon. However, it does cause you to sleep poorly (damn cramping), put more stress on your body, and your diet pretty well is shot because you’re not absorbing important things! One of the first things I did once realizing my mishap with gluten was get a mani/pedi. Next, I started giving myself a few extra minutes at night for a facial. Did it cure my celiac? No. But it did help my skin heal from its glutenous battle. And I can admit it now. I’m vain. Looking good makes me feel good. It’s so important that we realize that celiac disease has its emotional aspect as well. No one wants to feel sick constantly. It’s exhausting. So when you’re having a “celiac moment” (regardless if it’s for a few weeks like my silly slip or if it is a one time mishap) make sure you pamper yourself! It’s the best way to get back to feeling fabulous!
 Gingerbread cookies and holidays are pretty synonymous. You can use this recipe to make gingerbread men but I prefer to “cheat” on this one. Making small 1 inch balls and flattening them with the bottom of a glass dipped in sugar is way easier, and the extra sugar on top gives a nice sweet layer! Just be prepared to want to dig into them right away- they smell amazing while they are cooking! In fact, I’m pretty sure that it is impossible not fall into the holiday spirit while these are baking! They are one of my favorite recipes to make and I’m not even a huge gingerbread fan! But they smell so good!


 Given that it is fall and pumpkins are super yummy, here is my favorite recipe for pumpkin cupcakes. Now I’m a huge fan of not reinventing the wheel. Betty Crocker makes a fabulous gluten free cake mix which I love to “fancy up” depending on the season! Why struggle with mixing different flours when you don’t have to!?!? Thanks Betty!